Tag: two-week wait

  • At-Home Insemination Success Rates: What to Expect During the Two-Week Wait

    Summary:

    At-home insemination is an increasingly popular method of conceiving for couples and individuals who are struggling with fertility or who simply want to experience the joys of parenthood. However, the two-week wait after an at-home insemination can be a time filled with anxiety, anticipation, and uncertainty. In this blog post, we will discuss what to expect during the two-week wait and the success rates of at-home insemination.

    The two-week wait, also known as the “waiting period,” is the time between an at-home insemination and when you can take a pregnancy test to determine if the procedure was successful. This timeframe is crucial and can be emotionally challenging for many individuals, as they eagerly await the results of their efforts to conceive. It is essential to understand the various factors that can affect the success rates of at-home insemination during this time.

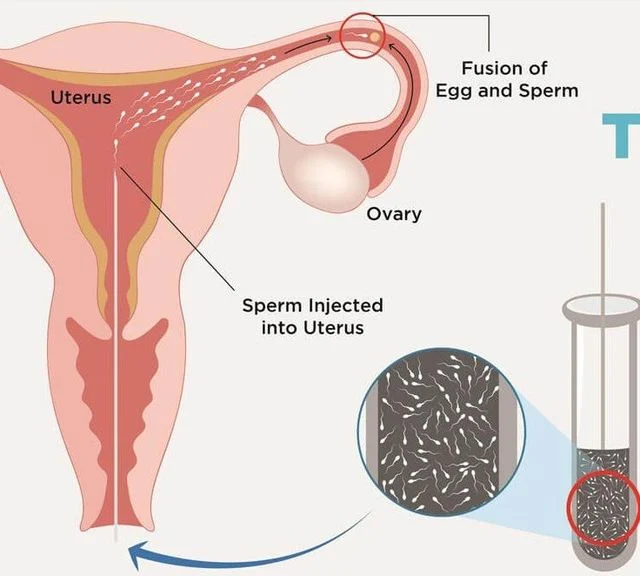
    One of the critical factors that can influence the success rates of at-home insemination is the timing of the procedure. Timing is crucial in at-home insemination because the sperm needs to be present in the reproductive system at the time of ovulation to increase the chances of conception. Therefore, tracking ovulation and timing the insemination correctly can significantly impact the success rates. It is recommended to use ovulation prediction kits or track fertility signs to determine the best time for insemination.

    Another factor that can affect the success rates of at-home insemination is the quality and quantity of sperm used. It is essential to use high-quality sperm, which is fresh, motile, and free from any infections or genetic abnormalities. The recommended method of obtaining sperm for at-home insemination is through a sperm donor bank or a known donor who has completed thorough medical screenings. Additionally, using a syringe or a cervical cap can also help in delivering the sperm directly to the cervix, increasing the chances of successful conception.

    illustration of a uterus with a syringe, representing intrauterine insemination procedure

    At-Home Insemination Success Rates: What to Expect During the Two-Week Wait

    The age and overall health of the individual undergoing at-home insemination can also impact the success rates. As women age, their fertility declines, and the chances of conceiving decrease. Therefore, it is crucial to consider age and overall health before proceeding with at-home insemination. Additionally, underlying health conditions such as polycystic ovary syndrome (PCOS) or endometriosis can affect fertility and should be taken into account when determining the success rates of at-home insemination.

    During the two-week wait, it is essential to take care of yourself both physically and emotionally. It can be a stressful and emotional time, and it is crucial to manage stress levels to increase the chances of success. Engaging in relaxation techniques such as yoga, meditation, or deep breathing can help alleviate stress and promote overall well-being. It is also essential to maintain a healthy diet and avoid alcohol, smoking, and other harmful substances that can affect fertility.

    While the two-week wait can be challenging, it is essential to avoid taking a pregnancy test too early. Taking a test too soon can lead to false negative results, causing unnecessary disappointment and anxiety. It is recommended to wait at least two weeks after the insemination before taking a pregnancy test for accurate results.

    The success rates of at-home insemination vary and are dependent on various factors. According to studies, the success rates range from 10% to 20% per cycle. However, with proper timing, healthy sperm, and a healthy lifestyle, the chances of success can increase significantly. It is also essential to keep in mind that it may take multiple cycles of at-home insemination to achieve pregnancy, and patience is key.

    In conclusion, the two-week wait after an at-home insemination can be an emotionally challenging time, but understanding the various factors that can affect success rates can help alleviate some of the anxiety and uncertainty. Proper timing, healthy sperm, age and overall health, and self-care during this time can all contribute to the success of at-home insemination. Remember to be patient, take care of yourself, and seek support from loved ones during this journey.

  • DIY Insemination: A Personal Success Story

    DIY Insemination: A Personal Success Story

    For many people, the journey to parenthood can be a challenging and emotional one. As a same-sex couple, my partner and I knew that we would have to take a non-traditional route to start our family. After much research and consideration, we decided to try DIY insemination – a process where the sperm is manually inserted into the uterus at home. While it may seem daunting to some, it was a personal success story for us. In this blog post, I want to share our experience with DIY insemination and how it has allowed us to fulfill our dream of becoming parents.

    The Decision to Try DIY Insemination

    After months of discussing our options, my partner and I decided to try DIY insemination. We wanted to have a child that was biologically related to one of us, and this was the most affordable and accessible option for us. We also wanted to have control over the process and be able to do it in the comfort of our own home.

    Research and Preparation

    Before embarking on our DIY insemination journey, we did a lot of research and preparation. We read articles, watched videos, and consulted with medical professionals to ensure that we were fully informed and prepared. We also made sure to have all the necessary supplies, including a sterile syringe, ovulation predictor kits, and a sperm collection cup.

    Tracking Ovulation

    One of the most crucial aspects of DIY insemination is tracking ovulation. We used ovulation predictor kits to determine when I was ovulating. This helped us determine the best time to do the insemination, as sperm can survive in the uterus for up to five days. We also tracked my basal body temperature and cervical mucus to confirm ovulation.

    The Insemination Process

    Diagram illustrating the IUI process, showing sperm injection into the uterus and egg fertilization.

    DIY Insemination: A Personal Success Story

    On the day of the insemination, we followed a strict process to ensure the best chances of success. We started by washing our hands and sterilizing all the supplies. My partner collected her sperm in the cup, and we used a sterile syringe to draw it up. We then inserted the syringe into my vagina and pushed the sperm into my uterus. We kept my legs elevated for 20 minutes to allow the sperm to swim towards the cervix.

    The Two-Week Wait

    After the insemination, we entered the dreaded two-week wait. This is the period between the insemination and when a pregnancy test can accurately detect the hormone hCG. We tried our best to stay positive and busy during this time. We also took precautions such as avoiding alcohol and caffeine and maintaining a healthy diet.

    The Positive Pregnancy Test

    When the two-week wait was over, we took a pregnancy test, and to our delight, it was positive! We couldn’t believe that our first attempt at DIY insemination had been successful. We were overjoyed and emotional, knowing that our dream of starting a family was finally coming true.

    The Journey to Parenthood

    From that positive pregnancy test, our journey to parenthood began. We had regular check-ups with our doctor and made sure to take care of ourselves throughout the pregnancy. Nine months later, our beautiful baby boy was born, and we couldn’t have been happier.

    Our DIY insemination experience was a personal success story that has allowed us to start our family on our own terms. While it may not be the right option for everyone, it was the perfect choice for us. It allowed us to have a child that is biologically related to one of us and have control over the process. We are forever grateful for the opportunity to become parents through DIY insemination.

    In conclusion, DIY insemination may seem intimidating and unconventional, but for my partner and me, it was a personal success story. With proper research, preparation, and tracking, we were able to start our journey to parenthood and fulfill our dream of having a family. We hope that by sharing our experience, we can inspire and educate others who may be considering DIY insemination as an option for starting a family.

  • The Importance of Patience in At-Home Insemination

    Title: The Power of Patience: Why It Matters in At-Home Insemination

    At-home insemination, also known as self-insemination, is becoming an increasingly popular option for couples and individuals trying to conceive. This method involves using a donor’s sperm to fertilize an egg at home, without the assistance of a medical professional. While this process may seem simple and straightforward, there is one crucial element that is often overlooked: patience.

    Patience is defined as the ability to endure difficult situations or delays without becoming frustrated or anxious. In the context of at-home insemination, patience refers to the ability to wait for the right time and conditions to achieve a successful pregnancy. It may seem like a minor factor, but the truth is that patience plays a significant role in the success of at-home insemination. Let’s take a closer look at why patience is crucial in this process.

    Timing is Everything
    One of the most critical aspects of at-home insemination is timing. Unlike in a medical setting, where a doctor can precisely determine the best time for insemination, at-home insemination requires a bit of guesswork. Sperm can live inside the female body for up to five days, while an egg is only viable for 12-24 hours after ovulation. This means that timing is crucial, and patience is essential in waiting for the right time to begin insemination. Rushing the process or becoming impatient can result in missed opportunities and decreased chances of pregnancy.

    Tracking Ovulation
    To determine the best time for insemination, it is essential to track ovulation. This can be done through various methods, such as tracking basal body temperature, monitoring cervical mucus, or using ovulation predictor kits. However, these methods require patience and consistency. It may take a few cycles to understand your ovulation patterns fully, and it is crucial to remain patient during this learning process. Becoming impatient and skipping or forgetting to track ovulation accurately can lead to missed opportunities for conception.

    illustration of a uterus with a syringe, representing intrauterine insemination procedure

    The Importance of Patience in At-Home Insemination

    The Two-Week Wait
    After insemination, the waiting game begins. This period is often referred to as the two-week wait, as it is the average amount of time it takes for a pregnancy test to detect the hormone hCG, which indicates pregnancy. This period can be incredibly challenging for those trying to conceive, as it is filled with uncertainty and anticipation. However, patience is vital during this time. It is crucial not to take a pregnancy test too early, as it may result in a false negative. Waiting the full two weeks, or even a few days longer, can provide more accurate results and prevent heartache caused by false hope.

    An Emotional Rollercoaster
    The journey of at-home insemination can be an emotional rollercoaster. From the initial decision to try insemination to the two-week wait and beyond, there are many ups and downs. It is essential to remain patient and manage expectations throughout this process. Becoming impatient or frustrated can lead to added stress, which can affect both physical and emotional well-being. Maintaining a positive and patient mindset is crucial in navigating this journey and increasing the chances of success.

    Challenges and Setbacks
    At-home insemination is not always a smooth process. There may be challenges and setbacks along the way, such as missed ovulation or negative pregnancy tests. These moments can be frustrating and disheartening, but it is important to remember that patience is key. It may take multiple cycles before achieving a successful pregnancy, and it is essential to remain patient and keep trying. Giving up too soon due to impatience or frustration can result in missing out on the joy of starting a family.

    In conclusion, patience is a crucial element in the at-home insemination process. It requires patience to track ovulation accurately, wait for the right time to begin insemination, and endure the two-week wait. It is also essential to maintain patience and a positive mindset during the emotional journey of trying to conceive. Challenges and setbacks may arise, but remaining patient and persistent can ultimately lead to success in achieving pregnancy.

    In a world where everything is fast-paced and instant, it can be challenging to cultivate patience. However, when it comes to at-home insemination, patience is a necessary virtue. Taking the time to track ovulation, wait for the right time, and manage expectations can increase the chances of a successful pregnancy. So, if you are considering at-home insemination, remember the power of patience and embrace it as a vital part of the process.