DIY Insemination: A Personal Success Story
For many people, the journey to parenthood can be a challenging and emotional one. As a same-sex couple, my partner and I knew that we would have to take a non-traditional route to start our family. After much research and consideration, we decided to try DIY insemination – a process where the sperm is manually inserted into the uterus at home. While it may seem daunting to some, it was a personal success story for us. In this blog post, I want to share our experience with DIY insemination and how it has allowed us to fulfill our dream of becoming parents.
The Decision to Try DIY Insemination
After months of discussing our options, my partner and I decided to try DIY insemination. We wanted to have a child that was biologically related to one of us, and this was the most affordable and accessible option for us. We also wanted to have control over the process and be able to do it in the comfort of our own home.
Research and Preparation
Before embarking on our DIY insemination journey, we did a lot of research and preparation. We read articles, watched videos, and consulted with medical professionals to ensure that we were fully informed and prepared. We also made sure to have all the necessary supplies, including a sterile syringe, ovulation predictor kits, and a sperm collection cup.
Tracking Ovulation
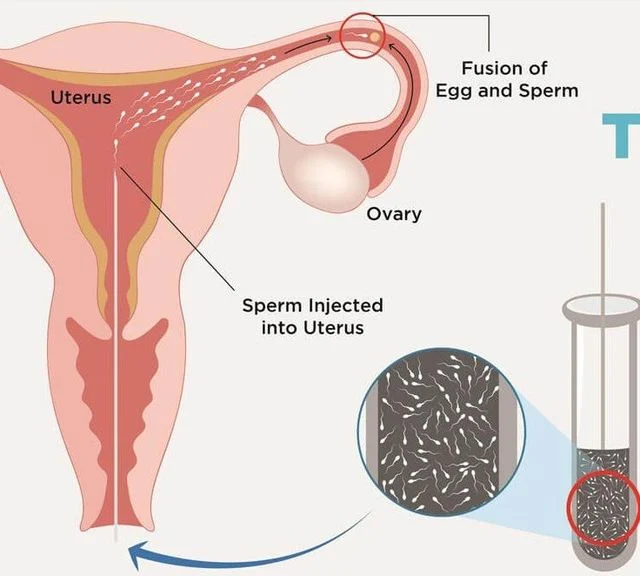
One of the most crucial aspects of DIY insemination is tracking ovulation. We used ovulation predictor kits to determine when I was ovulating. This helped us determine the best time to do the insemination, as sperm can survive in the uterus for up to five days. We also tracked my basal body temperature and cervical mucus to confirm ovulation.
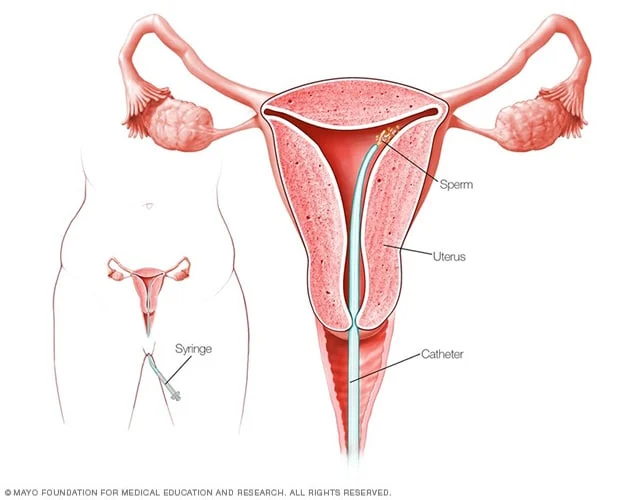
The Insemination Process
DIY Insemination: A Personal Success Story
On the day of the insemination, we followed a strict process to ensure the best chances of success. We started by washing our hands and sterilizing all the supplies. My partner collected her sperm in the cup, and we used a sterile syringe to draw it up. We then inserted the syringe into my vagina and pushed the sperm into my uterus. We kept my legs elevated for 20 minutes to allow the sperm to swim towards the cervix.
The Two-Week Wait
After the insemination, we entered the dreaded two-week wait. This is the period between the insemination and when a pregnancy test can accurately detect the hormone hCG. We tried our best to stay positive and busy during this time. We also took precautions such as avoiding alcohol and caffeine and maintaining a healthy diet.
The Positive Pregnancy Test
When the two-week wait was over, we took a pregnancy test, and to our delight, it was positive! We couldn’t believe that our first attempt at DIY insemination had been successful. We were overjoyed and emotional, knowing that our dream of starting a family was finally coming true.
The Journey to Parenthood
From that positive pregnancy test, our journey to parenthood began. We had regular check-ups with our doctor and made sure to take care of ourselves throughout the pregnancy. Nine months later, our beautiful baby boy was born, and we couldn’t have been happier.
Our DIY insemination experience was a personal success story that has allowed us to start our family on our own terms. While it may not be the right option for everyone, it was the perfect choice for us. It allowed us to have a child that is biologically related to one of us and have control over the process. We are forever grateful for the opportunity to become parents through DIY insemination.
In conclusion, DIY insemination may seem intimidating and unconventional, but for my partner and me, it was a personal success story. With proper research, preparation, and tracking, we were able to start our journey to parenthood and fulfill our dream of having a family. We hope that by sharing our experience, we can inspire and educate others who may be considering DIY insemination as an option for starting a family.